
 English
 русский
 Español
 عربى
عربى
Content
- 1 What Are Aluminum Rain Gutter Accessories?
- 2 Key Components in a Color Aluminum Rain Gutter System
- 3 Step-by-Step: How to Install a Color Aluminum Rain Gutter System
- 3.1 Step 1: Site Assessment and Groove Height Verification
- 3.2 Step 2: Establish the Installation Line
- 3.3 Step 3: Position and Mark the Gutter Hangers
- 3.4 Step 4: Pre-Drill Through Hanging Pieces
- 3.5 Step 5: Drill the Cornice and Install Expansion Screw Holsters
- 3.6 Step 6: Secure the Gutter with Hangers and Expansion Screws
- 4 Why Spacing Standards Matter for Gutter Hangers
- 5 Advantages of Color Aluminum Over Other Gutter Materials
- 6 Common Installation Errors and How to Avoid Them
- 7 Selecting the Right Accessories for Your Project
What Are Aluminum Rain Gutter Accessories?
When it comes to protecting a building from water damage, the gutter system is only as effective as the components that hold it together. Aluminum rain gutter accessories refer to the full range of hardware and fittings used to install, support, seal, and connect a gutter system — from hangers and brackets to end caps, miters, outlets, and expansion screws. These accessories are engineered to work in tandem with the main gutter channel, ensuring long-term performance even under heavy rainfall or thermal expansion.
Aluminum alloy is the preferred material for these accessories because it combines lightweight properties with excellent corrosion resistance and structural strength. Unlike vinyl components that may crack under UV exposure, or steel parts that are prone to rust, aluminum alloy accessories maintain their integrity across a wide range of climates. This makes them suitable for both residential eaves and commercial roofline applications.
A complete set of aluminum rain gutter accessories can meet various needs across different roof types, slope configurations, and architectural styles. Whether you are working with a low-pitch tile roof or a steep-slope metal roof, the right accessories ensure a flush, secure, and watertight gutter installation.
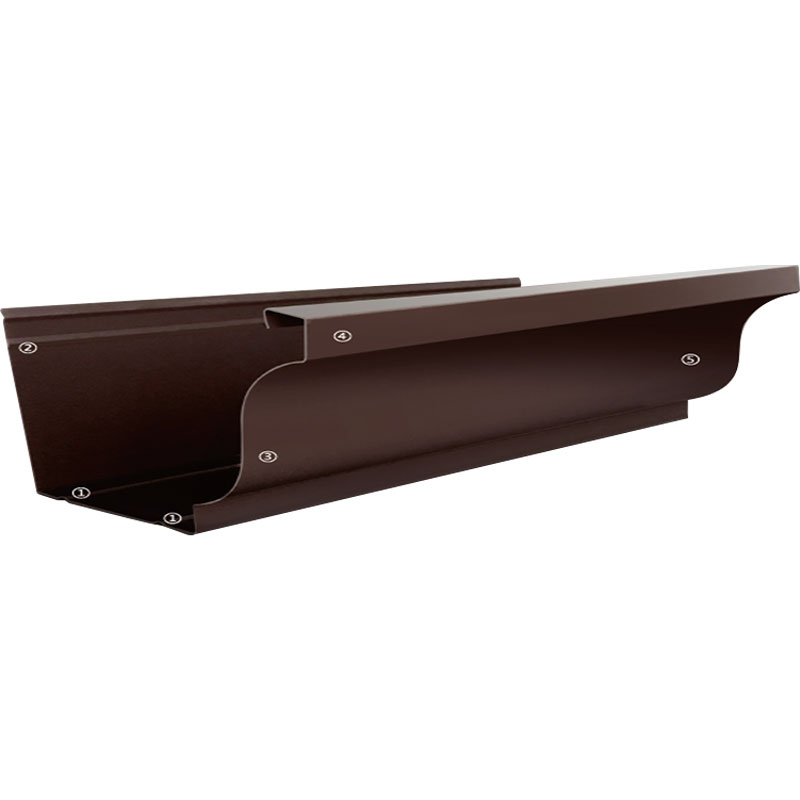
Key Components in a Color Aluminum Rain Gutter System
A color aluminum rain gutter system is more than just a painted trough. It integrates multiple precision components, each serving a specific structural or functional purpose. Understanding what each part does helps installers select the right accessories and ensures the system performs as designed.
| Component | Function |
| Gutter Hangers | Attach the gutter channel to the fascia or cornice wall |
| Expansion Screws | Anchor hangers to masonry or concrete surfaces via screw holsters |
| End Caps | Seal the open ends of gutter runs to prevent leakage |
| Inside / Outside Miters | Connect gutter sections at interior and exterior roof corners |
| Gutter Outlet | Channels water from the gutter into the downspout |
| Downspout Elbow | Redirects water flow at the base of the downspout |
Color aluminum rain gutter systems add another dimension: the surface finish. These systems are typically coated using a PVDF or polyester powder coating process that bonds color directly to the aluminum substrate. This means the accessories — hangers, miters, caps — must also be color-matched to maintain a cohesive appearance. Mismatched components are not only aesthetically inconsistent but may also indicate material incompatibilities that reduce system longevity.

Step-by-Step: How to Install a Color Aluminum Rain Gutter System
Proper installation is the foundation of a gutter system's performance. Even the highest-quality aluminum rain gutter accessories will fail prematurely if installed incorrectly. The following process outlines a professional installation method suitable for eave-mounted color aluminum gutters.
Step 1: Site Assessment and Groove Height Verification
Before touching any hardware, observe the height and verticality of the existing shirt groove — the structural recess or wall section at the eave where the gutter back wall will be anchored. This step is critical: if the groove height is insufficient or the surface is out of plumb, the entire gutter run will be misaligned. A tilted or non-vertical groove cannot be corrected by shimming accessories alone, and professional technical consultation is required before proceeding.
Step 2: Establish the Installation Line
Take a reference point at one end of the eave and mark the installation line approximately 3 cm below the bottom of the roof tile. This offset is intentional — it positions the gutter upper edge just below the drip edge of the tile, ensuring that rainwater flows directly into the gutter channel rather than splashing over the back wall. Once both end points are established, spring a chalk line or installation wire along the entire length of the eave to create a straight, level reference.
Step 3: Position and Mark the Gutter Hangers
Hang the gutter hangers along the installation line, maintaining a consistent spacing of 450–500 mm across the main run. At the ends of each gutter section and at all yin and yang corners (inside and outside miters), reduce the spacing to 300 mm to provide additional structural support where stress concentrations are highest. Mark each hanger position clearly before drilling.
Step 4: Pre-Drill Through Hanging Pieces
Once hangers are positioned, drill pilot holes through the back wall of the gutter using the hanger holes as a guide. This pre-drilling step ensures precise hole alignment between the hanger and the gutter back wall, which is critical for a flush, rattle-free installation. Place the inspection gutter temporarily on the eaves with its upper back wall edge aligned to the installation line, then use a marker pen to transfer hole positions onto the cornice surface.
Step 5: Drill the Cornice and Install Expansion Screw Holsters
Remove the gutter and drill into the cornice at each marked position. Insert expansion screw holsters (anchor sleeves) into each hole. These holsters are designed to grip the interior of masonry or concrete, providing a threaded socket that accepts expansion screws without cracking the substrate. Using holsters is a non-negotiable step when anchoring into hard surfaces — driving screws directly into unsleeved concrete holes results in poor holding strength and eventual loosening.
Step 6: Secure the Gutter with Hangers and Expansion Screws
Return the gutter to the eave, align the back wall holes with the installed holsters, thread the hangers through, and drive expansion screws to lock everything in place. Tighten screws to a firm hold without over-torquing, which could deform the aluminum back wall. Once secured, verify the gutter slope — a minimum fall of 2–3 mm per linear meter toward the outlet is recommended to ensure self-draining performance.
Why Spacing Standards Matter for Gutter Hangers
The 450–500 mm hanger spacing specification is not arbitrary. It is calculated based on the load-bearing capacity of standard aluminum alloy profiles when filled with water and debris. Excessive spacing — say, 600 mm or more — creates unsupported spans that flex under load, leading to sagging gutters, joint separation, and eventual fascia damage. The tighter 300 mm spacing at ends and corners compensates for the higher mechanical stress at these transition points.
In regions with heavy snow loads or frequent debris accumulation, some installers reduce standard spacing to 400 mm across the full run. This is a valid adaptation and well within the design tolerance of quality aluminum rain gutter accessories. The key principle is that spacing decisions should always account for local environmental conditions, not just convenience.
Advantages of Color Aluminum Over Other Gutter Materials
The decision to specify a color aluminum rain gutter system over alternatives like PVC, galvanized steel, or copper involves several practical and aesthetic trade-offs. Here is how aluminum compares across the most relevant performance criteria:
- Corrosion resistance: Aluminum naturally forms an oxide layer that protects against rust. Unlike galvanized steel, it does not rely on a coating that eventually wears away. Color-coated aluminum gutters provide an additional barrier that extends the substrate's lifespan further.
- Weight: Aluminum is significantly lighter than steel or copper, reducing the load on fascia boards and simplifying single-person installation of long gutter runs.
- Color retention: PVDF-coated color aluminum gutters maintain consistent color for 15–25 years with minimal fading, whereas painted steel gutters may show chalking and peeling within 5–10 years.
- Thermal expansion: Aluminum expands and contracts with temperature changes. This makes proper joint sealing and hanger placement even more important — flexible joints and correctly spaced hangers allow movement without buckling.
- Recyclability: Aluminum is fully recyclable at end of life, making color aluminum rain gutter systems a more sustainable choice compared to PVC, which is difficult to recycle and may release harmful byproducts if incinerated.
Common Installation Errors and How to Avoid Them
Even experienced installers occasionally make mistakes that compromise gutter performance. Awareness of the most frequent errors helps prevent costly rework.
- Incorrect installation line height: Placing the gutter too low relative to the roof tile drip edge causes water to overshoot the gutter during heavy rain. Always verify the 3 cm offset from the tile bottom before stringing the line.
- Skipping the inspection gutter step: Some installers skip the dry-fit alignment step and drill directly. This often results in holes that do not align with hanger positions, requiring re-drilling or additional hardware.
- Using standard screws instead of expansion screws: Standard screws in masonry substrates pull out under load. Expansion screw holsters are mandatory when anchoring into concrete cornices or brick eave walls.
- Ignoring groove verticality: A tilted or out-of-plumb shirt groove cannot be corrected by adjusting accessories. If the groove is not straight, contact technical personnel before proceeding — forcing an installation over a defective groove will produce a visibly crooked gutter run and may structurally compromise the anchor points.
Selecting the Right Accessories for Your Project
Not all aluminum rain gutter accessories are interchangeable. Selecting components that are correctly matched to your specific gutter profile, substrate type, and climate zone is essential for long-term performance. When sourcing accessories, verify the following:
- Hanger design and load rating must match the gutter profile (K-style, box, round, or fascia) and anticipated water volume.
- Color coatings on all accessories — hangers, end caps, miters — should be sourced from the same manufacturer or batch as the gutter channel to ensure color consistency over time.
- Expansion screw holsters must be rated for the substrate material — different sleeve types are required for dense concrete versus hollow-core block or brick.
- For projects in areas with extreme temperature swings, specify accessories with a proven thermal compatibility range to avoid differential expansion between the gutter body and its fittings.
A reliable supplier of aluminum rain gutter accessories should be able to provide complete system documentation, including load tables, spacing specifications, and color matching charts. This information is essential for both design-stage planning and on-site quality control.


